Wednesday, November 12, 2008

Hacking Intranet + Dialup di Windows


Hacking Intranet + Dialup di Windows

Saya sedang kerja di laptop yang tersambung ke Intranet। Terus saya ingin sambung ke Internet dengan dial-up modem. Ternyata, Intranet-nya jadi macet. Ini pengalaman trouble-shooting saya.

Pertama buat test, saya luncurkan kotak prompt DOS, lalu test ping komputer lain di intranet.

F:prj>ping 192.168.100.64

Pinging 192.168.100.64 with 32 bytes of data:
Request timed out.
Request timed out.
Request timed out.
Ping statistics for 192.168.100.64:
Packets: Sent = 4, Received = 0, Lost = 4 (100% loss),
Approximate round trip times in milli-seconds:
Minimum = 0ms, Maximum = 0ms, Average = 0ms
Ternyata memang tidak bisa, padahal kalau cuma Intranet biasanya bisa.

Sedikit-sedikit, saya tahu ini pasti masalah routing. Jadi saya panggil "route print"

F:prj>route print

Active Routes:
Network Address Netmask Gateway Address Interface Metric
0.0.0.0 0.0.0.0 100.200.3.189 100.200.3.189 1
0.0.0.0 0.0.0.0 192.168.100.1 192.168.100.63 2
127.0.0.0 255.0.0.0 127.0.0.1 127.0.0.1 1
192.168.100.0 255.255.0.0 100.200.3.189 100.200.3.189 1
100.200.3.189 255.255.255.255 127.0.0.1 127.0.0.1 1
192.168.100.0 255.255.255.0 100.200.3.189 100.200.3.189 1
192.168.100.0 255.255.255.0 192.168.100.63 192.168.100.63 2
192.168.100.63 255.255.255.255 127.0.0.1 127.0.0.1 1
192.168.100.255 255.255.255.255 192.168.100.63 192.168.100.63 1
224.0.0.0 224.0.0.0 100.200.3.189 100.200.3.189 1
224.0.0.0 224.0.0.0 192.168.100.63 192.168.100.63 1
255.255.255.255 255.255.255.255 100.200.3.189 100.200.3.189 1
Dalam hal ini:
IP intranet laptop = 192.168.100.63
IP dialup laptop (disamarkan) = 100.200.3.189
Benar kan ... ternyata jalur routing-nya jadi berganda. Ada dua routing ke intranet (192.168.100.0/255.255.255.0) via interface 100.200.3.189 (modem) dan juga via 192.168.100.63 (ethernet). Masalahnya, yang lewat modem metricnya 1, jadi akan dipilih lebih dulu dibanding yang metric-nya 2. Dengan demikian, paket yang mestinya ke intranet, akan dikirim ke internet !!! Bahaya besar. Kalau ketahuan saya akan dimarahi oleh yang mbaurekso Internet.

Buat memperbaikinya, tentu saja routing salah tersebut harus dihapus. Kalau di Linux gampang. Di Windows 98 ternyata tidak bisa-bisa.

F:prj>route delete 192.168.100.0 mask 255.255.255.0 100.200.3.189
The route specified was not found.

F:prj>route delete 192.168.100.0
The route specified was not found.

F:prj>route delete 192.168.100.0 metric 1
The route specified was not found.
Hampir kehabisan akal, saya pergi ke ikon dial-up, buka propertiesnya. Setelah dicari sana sini, ketemu tempatnya, sembunyi jauh sekali:
  • Buka properties dial-up networking.
  • Klik tab "Server Type".
  • Klik tombol "TCP/IP Settings".
  • Hilangkan cek "default gateway on remote network".
  • Klik OK, OK sampai selesai.

Saya coba ulangi dial lagi. Aha ... sekarang bisa jalan. Tabel routingnya ternyata berubah jadi begini:

F:prj>route print

Active Routes:

Network Address Netmask Gateway Address Interface Metric
0.0.0.0 0.0.0.0 192.168.100.1 192.168.100.63 1
127.0.0.0 255.0.0.0 127.0.0.1 127.0.0.1 1
192.168.100.0 255.255.0.0 100.200.3.189 100.200.3.189 1
100.200.3.189 255.255.255.255 127.0.0.1 127.0.0.1 1
192.168.100.0 255.255.255.0 192.168.100.63 192.168.100.63 1
192.168.100.63 255.255.255.255 127.0.0.1 127.0.0.1 1
192.168.100.255 255.255.255.255 192.168.100.63 192.168.100.63 1
224.0.0.0 224.0.0.0 100.200.3.189 100.200.3.189 1
224.0.0.0 224.0.0.0 192.168.100.63 192.168.100.63 1
255.255.255.255 255.255.255.255 100.200.3.189 100.200.3.189 1
Perhatikan sekarang jalur routingnnya sudah tidak berganda.

Itu pengalaman saya hari ini. Mudah-mudahan ada gunanya.

Copyleft Kocil, 2003 under GNU FDL


ARP Guard

ARP Guard - perlindungan dari serangan ARP Spoofing


Melindungi ARP keracunanMelindungi ARP Spoofing
The threat of ARP attacks. External attacks by hackers, viruses, worms and trojans are permanent threats to any progressive company. Ancaman dari serangan ARP. Eksternal serangan oleh hacker, virus, cacing trojans dan ancaman yang permanen untuk setiap perusahaan progresif. What is not widely known, though, is that the major portion of attacks come from within the network. Apa saja yang tidak dikenal secara luas, meskipun, adalah bahwa porsi besar dari serangan datang dari dalam jaringan.

In 2002 KPMG reported that up to 80 % of all intrusions were initiated internally, from inside a company network. Pada tahun 2002 KPMG melaporkan bahwa hingga 80% dari semua intrusions telah dimulai secara internal, dari dalam jaringan perusahaan. Technical ignorance, curiosity and intentional manipulation of data often lead to serious damages for organisations. Teknis ketidaktahuan, keingintahuan dan manipulasi data secara sering mengakibatkan kerusakan serius untuk organisasi.

ARP serangan - ARP spoofing Klik di sini untuk non-teknis keterangan ARP serangan>>
ARP Angriffe - ARP SpoofingHier klicken für Nicht-Technische Erklärung von ARP Angriffen>>

Internal network attacks are typically operated via so called ARP Spoofing or ARP Poisoning attacks. Serangan jaringan internal biasanya dioperasikan melalui disebut ARP Spoofing ARP atau keracunan serangan. Malicious software to run ARP Spoofing attacks can be downloaded on the Internet by everyone. Perangkat lunak untuk menjalankan ARP Spoofing serangan dapat di-download di Internet oleh semua orang. Using fake ARP messages an attacker can divert all communication between two machines with the result that all traffic is exchanged via his PC. Menggunakan palsu ARP pesan penyerang dapat mengalihkan semua komunikasi antara dua mesin dengan hasil yang lalu lintas semua itu adalah komunikasi melalui PC. By means of such a man-in-the-middle attack the attacker can in particular Dengan cara seperti itu seorang laki-laki-dalam-dalam-tengah penyerang dapat menyerang khususnya

These ARP attacks are usually successful even with encrypted connections like SSL, SSH or PPTP. ARP serangan ini biasanya berhasil bahkan seperti sambungan terenkripsi dengan SSL, SSH atau PPTP. ARP belongs to the OSI data link layer (layer 2) . ARP tersebut masuk ke dalam lapisan OSI data link (lapisan 2).


ARP manusia-dalam-dalam-tengah-serangan


The symptoms of ARP spoofing attacks are: Gejala-gejala serangan ARP spoofing adalah:

  • Confidential company information has leaked out and nobody knows how it could have happened. Informasi rahasia perusahaan telah bocor dan tak tahu bagaimana dapat terjadi.
  • Your employees report about intrusion into their online bank account or into their email account. Anda karyawan laporan tentang hal-line mereka ke rekening bank atau ke account email mereka.
  • Inexplicable incidents have compromised the data of applications that can only be accessed via "secure" web interfaces. Yg tak dpt dipahami insiden telah tercemar data dari aplikasi yang hanya dapat diakses melalui "aman" antarmuka web.
  • Strange occurrences in the ARP tables of your network. Kejadian aneh di tabel ARP dari jaringan anda.

ARP spoofing attacks protection. ARP Guard is a system that forms an active protection shield against internal ARP attacks. ARP spoofing serangan perlindungan. ARP Guard adalah sistem yang aktif bentuk perlindungan terhadap perisai internal ARP serangan. The ARP Guard early warning system constantly analyzes all ARP messages , sends out appropriate alerts in real-time and identifies the source of the attack. The ARP Guard sistem peringatan dini terus menganalisis semua ARP pesan, mengirim keluar sesuai alert secara real-time dan mengidentifikasi sumber dari serangan. This protection system from ARP spoofing attacks can be configured not only to raise an alarm, if an ARP attack has been sensed, but even to automatically defend against the attacker. ARP Guard easily integrates with your existing IT security environments, such as firewalls, virus scanners, or intrusion detection systems, and forms an active and reliable shield against ARP spoofing. Ini sistem perlindungan dari serangan ARP spoofing dapat dikonfigurasi tidak hanya untuk meningkatkan alarm, jika sebuah serangan ARP telah sensed, tetapi bahkan secara otomatis untuk mempertahankan terhadap penyerang. ARP Guard mudah mengintegrasikan dengan Anda yang ada TI keamanan lingkungan, seperti firewall, virus scanner, atau sistem deteksi intrusi, dan bentuk yang aktif dan dapat diandalkan perisai terhadap ARP spoofing।

Informasi lebih lanjut

One-page brochure on ARP Spoofing and ARP Guard . Satu-halaman pada brosur dan ARP ARP Spoofing Guard.
Two-page brochure on ARP Spoofing und ARP Guard . Dua-halaman brosur pada ARP Spoofing und ARP Guard.
ARP spoofing and VoIP telephony . ARP spoofing dan VoIP telephony.

Media and press about us Media dan tekan tentang kami

Press and media about us on the topic of ARP-Spoofing and VoIP >> Tekan dan media tentang kami pada topik-ARP Spoofing dan VoIP>>

ARP Guard ready to install. Should you wish to obtain an offer on how to protect the network resources of your company or your organisation against ARP spoofing , please contact us or use this form to obtain a quote for having ARP Guard installed at your premises. ARP Guard siap untuk menginstal. Jika Anda ingin mendapatkan menawarkan cara untuk melindungi sumber daya dari jaringan perusahaan Anda atau organisasi Anda terhadap ARP spoofing, silahkan hubungi kami atau gunakan formulir ini untuk mendapatkan penawaran untuk memiliki ARP Guard diinstal di lokasi Anda.

For more general information about ARP, please click here >> Untuk informasi lebih umum tentang ARP, silakan klik di sini>>

* * * * * * * * * * * *

Interesting articles on ARP spoofing and ARP poisoning Menarik artikel pada ARP spoofing dan ARP keracunan

Angriff von Innen Angriff von Innen
by Gereon Ruetten und Oliver Stutzke (2005) oleh Gereon Ruetten und Oliver Stutzke (2005)
Nicht nur aus dem Internet werden PCs angegriffen, um Trojaner und Spyware zu installieren. Nicht Nur Ran dem Internet werden PC angegriffen, um Trojaner Spyware und zu installieren. Auch im LAN, beispielsweise in der Firma, versuchen bösartige Zeitgenossen Informationen auszuspähen. Selbst geswitchte Netzwerke bieten keinen Schutz, wenn Angreifer die Verbindung mittels ARP-Spoofing über sich umleiten. Auch im LAN, beispielsweise in der Firma, versuchen bösartige Zeitgenossen Informationen auszuspähen. Selbst geswitchte Netzwerke bieten keinen Schutz, wenn Angreifer mati Verbindung mittels-ARP Spoofing Über sich umleiten.

The Insider Threat Study Wawan ancaman studi
by US Secret Service (2005) oleh US Secret Service (2005)
This study [...] is the first of its kind to provide a comprehensive analysis of insider actions by analyzing both the behavioral and technical aspects of the threats. [...] Studi ini adalah pertama kali untuk memberikan sebuah analisis komprehensif oleh Insider tindakan menganalisis kedua-dua aspek teknis dan perilaku dari ancaman. The findings underscore the importance of organizations' technology, policies and procedures in securing their networks against insider threats, as most of the cases showcased in the report were perpetrated by insiders with minimal technical skills. Temuan menekankan pentingnya organisasi 'teknologi, kebijakan dan prosedur pengamanan dalam jaringan mereka terhadap ancaman Insider, karena sebagian besar kasus showcased dalam laporan yang perpetrated oleh insiders dengan sedikit keterampilan teknis. Various proactive practices are among the suggestions offered by the report. Berbagai proaktif antara praktek usulan-usulan yang ditawarkan oleh laporan.

Angriff von Innen Angriff von Innen
by Gereon Ruetten und Oliver Stutzke (2004) oleh Gereon Ruetten und Oliver Stutzke (2004)
Presentation explaining the ARP spoofing threat. Presentasi menjelaskan ARP spoofing ancaman.

Become a merchant for this IT security product Menjadi merchant ini untuk keamanan produk IT

IT companies with a network and security focus can become a merchant for this valuable IT security product . TI perusahaan dengan jaringan keamanan dan fokus dapat menjadi merchant ini berharga untuk TI keamanan produk.


Itelligence AG
ARP spoofing keamanan


vertico software vertico perangkat lunak
ARP VoIP Keamanan
Penjelasan:

ARP attack software can be downloaded for instance from ARP serangan perangkat lunak untuk dapat di-download dari contoh
http://www.oxid.it/projects.html

ARP milik OSI Layer 2 - Data Link

Thank you very much for your interest in our network security division and in our ARP spoofing protection products. Terima kasih banyak atas minat Anda dalam jaringan kami keamanan dan divisi kami di ARP spoofing perlindungan produk.


Sunday, November 9, 2008

Introduction


Packet Sniffing is a fascinating subject. It wears both hats, the good and the evil. It's used by many (including myself) to detect network faults etc...but the same technology allows someone to "sniff" out passwords for your mail account or even your internet account. Now you understand why securing/encrypting your data is so important.

When a file is "deleted" what actually happens? Your operating system removes the reference to that file on the file system. This reference had details such as where on the disk the file was. Whilst marked and available as free space the old data didn't move, its just not seen on the file system but physically exisits on the disk. The entire file remains on the disk until another data is created over the physical area, and even then it may be possible to recover data by studying the magnetic fields on the platter surface.

What's a packet sniffer?


When you make contact with the Internet, data isn't sent in one continuous stream of data; this would be impractical and it would limit the performance of the Internet network. To keep the performance of the Internet as high as possible, the data is cut in slices. Such a slice of data (either inbound or outbound) is called "a packet". Now, you can't see atoms with your naked eye can you? No, I thought so. Sending information on a network means sending "packets" of data. Think of them like the atoms. A lot of packets will create the final information you will see on your screen, be it website or email. To "see" the atoms you would need a special device, some kind of electron microscope, to be able to see the "packets" you've sent or received... you also need a special device. This is a special type of monitoring program called... a packet sniffer. By using a packet sniffer you're able to see any bit of information entering or leaving your computer... even those you normally wouldn't see!

A packet sniffer can be considered as a sort of wire tap device. A device that can "plug" into computer networks and eavesdrops on the network traffic. Just as a telephone wiretap allows the CIA to listen to conversations, the same concept follows a packet sniffer in the sense that it allows someone to listen in on computer conversations.

How packet sniffers work


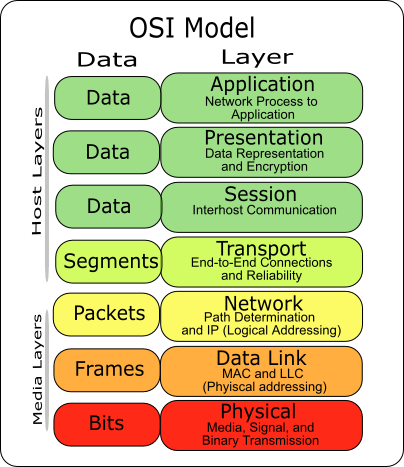
Packet sniffers capture "binary" data passing through the network, most if not all decent sniffers "decode" this data into a human readable form. To make it even easier (for humans) another step occurs known as "protocol analysis". There is a varying degree of the analysis that takes place, some are simple, just breaking down the "packet" information. Others are more complex giving "detailed" information about what it sees on the packet (i.e., highlights a password for a service).

One very important (and very simple) point to understand is that the sniffer has to be on the same "wire" on which the data is travelling to. In short the "probing" device that "captures" the data has to be on the same wire. The data can then be relayed to a decoding computer on a different network.

Situation: Bob and John are engaged in a internet chat session. You are in a city far apart from where the two men reside. Bob and John are talking top secret details on a cocaine deal. You (the law abiding citizen) decide to sniff their chat session (from your location) to help the feds bust Bob and John.

The simple answer is you CAN'T do that as you don't have access to the path that the data travels from! Of course if you are a good hacker (or well Cracker) then you could install a Trojan on Bob or John's computer and run a sniffer from their system, thus the sniffer it self is on the same wire।
Basically to successfully sniff you have to be on a LAN that is connected with a hub and not a switch. Computers can be physically connected in many ways. If they are connected using a Hub then here is what happens. If there were 4 computers (A, B, C & D) and A wanted to send something to D then it goes through the hub. But the hub doesn't know where D is. So the hub "re-transmits" what A sent to all other computers. Computers B and C should ignore this data since the packet says it's for D. Computer D will obviously accept the data.

You can probably see the security issue here, since other computers nearly have direct access to data that's not meant for them. A packet sniffer can put your network card into promiscuous mode. In this mode the data not meant for that computer will silently pass through the system and thus allows for the packet sniffer to log data!

When computers are connected via a switch and not a hub then things are different. A switch actually knows which computers are connected to it. The switch also knows where the computers are. So when A sends something to D the data goes to the switch and it will send it directly to D without passing by B or C. So you cannot sniff data by installing a sniffer on computer B or C. Thus when functioning as intended a switch provides good sniffer protection!

Switches WON'T prevent sniffing - they make it harder)


There is a super important point to understand with sniffing and "switches". Whilst switches appear to protect against sniffers THERE ARE WAYS to "trick" the switch which can enable you to start sniffing. You can flood the switch with ARP requests which will cause the switch to start behaving like a hub, or you can trick the switch to redirect traffic to the sniffer system.

How do I prevent my data being sniffed?

Many services on the internet send data in the plain text. By default POP mail, SMTP (for sending mail) send data in clear text. The same applies for FTP, Telnet and News clients. ICQ, MSN and AOL Instant messengers send passwords again in clear text. In fact most services send passwords this way.

Ways to secure yourself

  1. When logging into to mail services check to see if your mail client supports encrypted login's. The server has to support this setting too, so check with them.
  2. Even if you login securely (above) any e-mail you send is still in clear text, anyone on the path that the mail travels through can technically read it. Use Encryption to encrypt the message. PGP (www.pgpi.org) is the popular application for this
  3. When shopping on-line make sure the store has a "secure" connection for submitting credit card details. Generally SSL 128bit encryption is the standard.
  4. Telnet sends password and normal data in plain text. If your server supports SSH then use this instead of Telnet since the connection is encrypted.

If possible use a Switch rather than a HUB on a LAN. This provides extremely efficient protection in practice (more work required to successfully sniff). This method is a frontline defence but it shouldn't be a method fully relied upon.

It's near impossible to detect that a packet sniffer is sniffing a connection. This is a passive act, the data is "logged" but unaltered. There are some methods of determining a packet sniffer, however they cannot conclude 100% what they found. A major clue that that sniffing MAY be taking place is the fact that many DNS lookup's are taking place. (i.e., the sniffer is attempting to convert IP addresses to host names) however this is only an indication for there may be other reasons as to why this may occur.

Another, stronger method of detecting if a packet sniffer is operating is to send an ARP request to the device in question to determine if it's in promiscuous mode. A packet which is not destined for your computer will be stopped at the hardware level if promiscuous mode is not on. The "device" in most cases is the network card of the computer running the sniffer.

Sniffer Paket

Dari Wikipedia bahasa Indonesia, ensiklopedia bebas

Langsung ke: navigasi, cari

Sniffer Paket (arti tekstual: pengendus paket — dapat pula diartikan 'penyadap paket') yang juga dikenal sebagai Network Analyzers atau Ethernet Sniffer ialah sebuah aplikasi yang dapat melihat lalu lintas data pada jaringan komputer. Dikarenakan data mengalir secara bolak-balik pada jaringan, aplikasi ini menangkap tiap-tiap paket dan terkadang menguraikan isi dari RFC (Request for Comments) atau spesifikasi yang lain. Berdasarkan pada struktur jaringan (seperti hub atau switch), salah satu pihak dapat menyadap keseluruhan atau salah satu dari pembagian lalu lintas dari salah satu mesin di jaringan. Perangkat pengendali jaringan dapat pula diatur oleh aplikasi penyadap untuk bekerja dalam mode campur-aduk (promiscuous mode) untuk "mendengarkan" semuanya (umumnya pada jaringan kabel).

Sniffer paket dapat dimanfaatkan untuk hal-hal berikut:

  • Mengatasi permasalahan pada jaringan komputer.
  • Mendeteksi adanya penyelundup dalam jaringan (Network Intusion).
  • Memonitor penggunaan jaringan dan menyaring isi isi tertentu.
  • Memata-matai pengguna jaringan lain dan mengumpulkan informasi pribadi yang dimilikanya (misalkan password).
  • Dapat digunakan untuk Reverse Engineer pada jaringan।

Sniffer paket yang terkenal


Pranala luar


ARP spoofing

Address Resolution Protocol (ARP) spoofing, also known as ARP poisoning or ARP Poison Routing (APR), is a technique used to attack an Ethernet wired or wireless network which may allow an attacker to sniff data frames on a local area network (LAN), modify the traffic, or stop the traffic altogether (known as a denial of service attack). The attack can obviously only happen on networks that indeed make use of ARP and not another method.

The principle of ARP spoofing is to send fake, or "spoofed", ARP messages to an Ethernet LAN. Generally, the aim is to associate the attacker's MAC address with the IP address of another node (such as the default gateway). Any traffic meant for that IP address would be mistakenly sent to the attacker instead. The attacker could then choose to forward the traffic to the actual default gateway (passive sniffing) or modify the data before forwarding it (man-in-the-middle attack). The attacker could also launch a denial-of-service attack against a victim by associating a nonexistent MAC address to the IP address of the victim's default gateway.

ARP spoofing attacks can be run from a compromised host, a jack box, or a hacker's machine that is connected directly onto the target Ethernet segment.

Application

ARP is a Layer 2 protocol। ARP request is considered broadcast traffic, while legitimate ARP Replies are not. As such, it is not designed to allow for any ID validation on the transaction. While ARP spoofing can occur in the course of ARP transactions, creating a race condition, the more common utilization is the distribution of unsolicited ARP responses which are cached by the clients creating the ARP cache poison scenario.

Defenses

An open source solution is ArpON "Arp handler inspectiON". It is a portable ARP handler which detects and blocks all ARP poisoning and spoofing attacks with static ARP inspection (SARPI) and dynamic ARP inspection (DARPI) approach on switched or hubbed LANs with or without DHCP.

Another method, such as DHCP snooping, can be utilised on larger networks. Via DHCP, the network device keeps a record of the MAC addresses that are connected to each port, so it can readily detect if a spoofed ARP has been received. This method is implemented on networking equipment by vendors such as Cisco, ProCurve, Extreme Networks, Dlink and Allied Telesis.

Detection is another avenue for defending against ARP spoofing. Arpwatch is a Unix program which listens for ARP replies on a network, and sends a notification via email when an ARP entry changes. Under Windows the GUI-driven software XArp v2 is available. It performs ARP packet inspection on a per network interface basis with configurable inspection filters and active verification modules. anti-arpspoof creates static ARP entries in the client and default gateway cache, and cleans poisoned dynamic entries.

Checking for the existence of MAC address cloning may also provide a clue as to the presence of ARP spoofing, though there are legitimate uses of MAC address cloning. Reverse ARP (RARP) is a protocol used to query the IP address(es) associated to one MAC address. If more than one IP address is returned, MAC cloning is present.

A simple defense that only works for simple ARP spoofing attacks is the use of static IP-MAC mappings। However, this only prevents simple attacks and does not scale on a large network as the mapping has to be set for each pair of machines, resulting in n*n ARP caches that have to be configured.

Legitimate usage

ARP spoofing can also be used for legitimate reasons. For instance, network registration tools may redirect unregistered hosts to a signup page before allowing them full access to the network.

Another legitimate implementation of ARP spoofing is used in hotels to allow traveling laptop users to access the Internet from their room, using a device known as a head end processor (HEP), regardless of their IP address.

ARP spoofing can also be used to implement redundancy of network services. A backup server may use ARP spoofing to take over a defective server and transparently offer redundancy.


ARP spoofing tools

Arpspoof (part of the DSniff suite of tools), Arpoison, Cain and Abel, Ettercap, and netcut are some of the tools that can be used to carry out ARP poisoning attacks।

See also

External links


Arabic subtitle, how to make it work under Ubuntu.

I had been using dual boot of Microsoft windows and linux for a long time as I couldn't completely migrate to Linux because of immature Arabic support. booting to windows to watch subtitled movies was not uncommon thing I was doing.
Now with complete linux arabic subtitle support , I rarely boot to windows only to play MS flight simulator.
Most of arabic subtitles files are written in windows-1256 character set encoding and very scarse of them are written UTF-8 encoding.

Totem:

Ubuntu comes with Totem media player that already support arabic subtitles out of the box
just select Edit > Preferences > General > Encoding > Arabic (WINDOWS-1256)
and make sure to select a font that support arabic, mine is set to "Nimbus sans L". Also make sure that the .sub or .srt file has the same file name as the media files without extensionp; ie. foo.srt for foo.avi .

Mplayer:

Mplayer and VLC require fribidi liberary to support arabic, but the stable version is not mature enough to support arabic joining, that why you will get unjoined arabic charcters on subtitles, so you have to install version 2 of fribidi from CVS repository and compile it yourself or if you are using ubuntu or debian , you can download and install a .deb package from here or zshare mirror here.
Then edit $HOME/.mplayer/gui.conf with your favourite text editor and append the following line at the end of the file

sub_cp = "cp1256"


Now subtitles should properly work, just make sure the video file foo.avi has foo.sub, or foo.srt subtitle file in the same directory.

VLC

For VLC you have to install fribidi version 2 as mentioned before and edit $HOME/.vlc/vlcrc with your favourite text editor, and find the following line and comment it

subsdec-autodetect-utf8=1


and change the line that begins with "subsdec-encoding" to

subsdec-encoding=windows-1256


save your file and fireup your vlc opening a subtitled media now you should have a working subtitle with arabic joining.
I have VLC 0.8.6e Janus (wxWidgets interface) installed from ubuntu hardy repository and it looks that it suffer from a bug preventing it from loading subtitles having charcters other than letters and numbers in its location and its filename, for example a file location includes something like this "Chaos.Theory[2007]DvDrip[cut].AC3-aXXo" will not work, just rename the video and subtitles filenames and directory names if needed.

P.S.

A good thing about fridbidi version 2 is that it will fix arabic shaping/joining problems for other applications that use it like amsn.

Install the arabic fonts package ttf-arabeyes from repository by

sudo apt-get install ttf-arabeyes

Simple Anti Netcut for linux

netcut is an arp spoofing/poisoning program that can disconnect other people from the lan.

so , i've been suffering from disconnects because of netcut since they started using it ,
on windows there is a small tool called anti netcut that can fix the arp table and resume the network connection.

but on linux there isn't any (or at least I didn't find it) , so I made this small app to do the same job of anti netcut.

it is written in python , and can work under both linux and windows.

I'm a python beginner , so any help/criticize is happily welcomed , also any attempt to make a simple gui for it is also welcome .

just make sure to run is as root .

في أمان الله
Attached Files
File Type: py antiNetCut.py (2.1 KB, 178 views)

Changing hostname in linux

to change the hostname:
Method 1:

from terminal run this command

$sudo echo "your_new_hostname" > /etc/hostname


Method 2"

System > Administration > Network > General (tab)

and change "Host name" value to whatever you want

p.s.
a good tip is to add your new hostname to /etc/hosts

$sudo echo "127.0.0.1 your_new_hostname" >> /etc/hosts

arptables, and ARP poisoning(Netcut, Switchspoofer, ..)

ARNetcut , WinARPspoofer, Switchsniffer,WinARPattacker , and other ARP poisoners are becoming popular now with the growing number of the free wifi hotspots and shared broadband connections, and arebeing used either for taking advatage of the whole network internet speed , or sniffing sensitive informations, emails, chat conversations, .. etc
i tried many ways to stop attacks on my linux like what mentiotioned here but i failed to stop the attacks
after several trials and forensics, I found that arptables is the solution
i installed arptables package

$sudo apt-get install arptables


the i have added these lines to my firewall script
provided that "192.168.1.1" is the gateway IP and "00:1D:0F:A9:F0:45" is the mac address of the gateway


#arptables -P INPUT DROP
#arptables -P OUTPUT DROP
#arptables -A INPUT -s 192.168.1.1 --source-mac 00:1D:0F:A9:F0:45 -j ACCEPT
#arptables -A OUTPUT -d 192.168.1.1 --destination-mac 00:1D:0F:A9:F0:45 -j ACCEPT
#arp -s 192.168.1.1 00:1D:0F:A9:F0:45


First line to set the policy of INPUT chain to DROP.
Second line to set the policy of OUTPUT chain to DROP.
Third line to only ACCEPT connections from trusted gateway.
Forth line to send replies only to the trusted hosts.
Fifth line to add static entry into the ARP table to link your trusted host to its own MAC.
What i liked in this this solution that your box will only be visible to the trusted hosts in your network, even when the attacker try to scan the network by anykind of software. A good combination between arptables and iptables makes you safe in untrusted switched networks.

Saturday, November 1, 2008

Sejarah Linux

Artikel utama untuk bagian ini adalah: Sejarah Linux

Sistem operasi Unix dikembangkan dan diimplementasikan pada tahun 1960-an dan pertama kali dirilis pada 1970. Faktor ketersediaannya dan kompatibilitasnya yang tinggi menyebabkannya dapat digunakan, disalin dan dimodifikasi secara luas oleh institusi-institusi akademis dan pada pebisnis.

Proyek GNU yang mulai pada 1984 memiliki tujuan untuk membuat sebuah sistem operasi yang kompatibel dengan Unix dan lengkap dan secara total terdiri atas perangkat lunak bebas.[6] Tahun 1985, Richard Stallman mendirikan Yayasan Perangkat Lunak Bebas dan mengembangkan Lisensi Publik Umum GNU (GNU General Public License atau GNU GPL). Kebanyakan program yang dibutuhkan oleh sebuah sistem operasi (seperti pustaka, kompiler, penyunting teks, shell Unix dan sistem jendela) diselesaikan pada awal tahun 1990-an, walaupun elemen-elemen tingkat rendah seperti device driver, jurik dan kernel masih belum selesai pada saat itu.[7] Linus Torvalds pernah berkata bahwa jika kernel GNU sudah tersedia pada saat itu (1991), dia tidak akan memutuskan untuk menulis versinya sendiri.[8]

Linux

Dari Wikipedia bahasa Indonesia, ensiklopedia bebas

Linux (diucapkan ˈlɪnəks atau /ˈlɪnʊks/)[1] adalah nama yang diberikan kepada sistem operasi komputer bertipe Unix. Linux merupakan salah satu contoh hasil pengembangan perangkat lunak bebas dan sumber terbuka utama. Seperti perangkat lunak bebas dan sumber terbuka lainnya pada umumnya, kode sumber Linux dapat dimodifikasi, digunakan dan didistribusikan kembali secara bebas oleh siapapun.[2]

Nama "Linux" berasal dari nama kernelnya (kernel Linux), yang dibuat tahun 1991 oleh Linus Torvalds. Sistemnya, peralatan sistem dan pustakanya umumnya berasal dari sistem operasi GNU, yang diumumkan tahun 1983 oleh Richard Stallman. Kontribusi GNU adalah dasar dari munculnya nama alternatif GNU/Linux.[3]

Linux telah lama dikenal untuk penggunaannya di server, dan didukung oleh perusahaan-perusahaan komputer ternama seperti Dell, Hewlett-Packard, IBM, Novell, Oracle Corporation, Red Hat, dan Sun Microsystems. Linux digunakan sebagai sistem operasi di berbagai macam jenis perangkat keras komputer, termasuk komputer desktop, superkomputer,[4], dan sistem benam seperti pembaca buku elektronik, sistem permainan video (PlayStation 2, PlayStation 3 dan XBox[5]), telepon genggam dan router. Para pengamat teknologi informatika beranggapan kesuksesan Linux dikarenakan Linux tidak bergantung kepada vendor (vendor independence), biaya operasional yang rendah, dan kompatibilitas yang tinggi dibandingkan versi UNIX tak bebas, serta faktor keamanan dan kestabilannya yang tinggi dibandingkan dengan sistem operasi lainnya seperti Microsoft Windows. Ciri-ciri ini juga menjadi bukti atas keunggulan model pengembangan perangkat lunak sumber terbuka (opensource software).

Sistem operasi Linux yang dikenal dengan istilah distribusi Linux (Linux distribution) atau distro Linux umumnya sudah termasuk perangkat-perangkat lunak pendukung seperti server web, bahasa pemrograman, basisdata, tampilan desktop (desktop environment) (seperti GNOME dan KDE), dan paket aplikasi perkantoran (office suite) seperti OpenOffice.org, KOffice, Abiword, dan Gnumeric.

Tutorial Instalasi Dual Boot Linux Windows

Dual Boot Linux Windows
Tutorial Instalasi Dual Boot Linux Windows untuk Pemula

Jika Anda ingin melakukan Dual Boot Linux dan Windows, pastikan Windows sudah terinstal terlebih dahulu didalam komputer. PCLINUX 3D OS memungkinkan Anda untuk menginstal Linux secara point n’ click dari awal sampai akhir instalasi, sehingga proses instalasi menjadi sangat mudah untuk dilakukan.

Berikut langkah demi langkah proses instalasi Dual Boot Linux Windows dengan menggunakan 3D OS :

1. Boot komputer dengan Live CD/DVD 3D OS.
2. Setelah masuk desktop, klik icon Install 3D OS untuk memulai proses instalasi.


Jika Anda login sebagai guest, suatu kotak dialog akan muncul menanyakan password untuk user root. Password untuk root adalah root.
3. Layar pembuka muncul. Klik tombol Next untuk memulai proses instalasi.


4. Pilih jenis harddisk dan kemudian klik tombol Next.


5. Jika didalam komputer telah terinstal Windows, pergunakanlah salah satu pilihan berikut :
* Remove Windows : untuk menghapus partisi Windows dan menggantinya dengan Linux
* Use free space on Windows : untuk membuat partisi Linux dari sisa ruang yang ada di partisi Windows. Gunakan pilihan ini jika Anda ingin Dual Boot Windows dan Linux.
* Custom disk partitioning : untuk menentukan sendiri pilihan partisi harddisk


6. Tentukan ukuran partisi yang akan dipergunakan untuk Linux.


7. Layar peringatan muncul di layar menyatakan bahwa Anda akan membuat partisi Linux. Klik tombol Next untuk melanjutkan.


Sampai disini Anda sudah berhasil membuat partisi Linux dari sisa ruang yang ada di partisi Windows. Untuk melanjutkan ke proses berikutnya, ikutilah petunjuk Tutorial Instalasi Linux untuk Pemula.

10 Fitur Tambahan Google Earth Yang Menakjubkan

BMG Personal untuk Anda


Sering kali kita tidak membawa payung atau justru membawa payung di saat hari cerah karena ramalan cuaca yang dilakukan oleh Badan Meteorologi dan Geofisika (BMG) salah. Untuk itu, bagaimana jika anda sendiri yang melakukan ramalan cuaca? Forum Google Earth yang disebut “Glooton” menciptakan sebuah link yang memungkinkan anda mengecek sendiri kondisi cuaca. Data tersebut akan ditampilkan pada Google Earth dan bisa menelusuri jejak dan posisi dari setiap badai dan angin topan pada seluruh planet ini. Data akan diperbaharui setiap 10 menit dan memungkinkan siapapun dengan PC bisa memiliki peramal cuaca pribadi.

Jutaan Foto dalam Satu Tempat


Beberapa kamera canggih (seperti Nikon Coolpix P6000) telah memiliki radio GPS di dalamnya yang secara otomatis bisa menangkap data lokasi di mana foto tersebut diambil dan melalui Google Earth anda bisa memulai membangun sebuah dunia yang penuh dengan foto-foto.

Google Earth menggunakan beberapa cara yang berbeda untuk mengeksplorasi fotografi. Salah satunya adalah, rekan dari Metal Toad Media telah mengambil seluruh katalog dari situs Flickr dan mengimplementasikannya sebagai Google Eart-compatible feed. Anda bisa melihat pengguna meng-upload foto Grand Canyon dan secara virtual akan muncul pada peta. Bulan Agustus lalu, Flickr menambahkan “3,2 juta gambar yang sudah diberikan label”, yang bisa anda lihat melalui Google Earth.

Saksikan Pemanasan Global Beraksi


Salah satu tantangan tersulit bagi para ahli iklim adalah meyakinkan beberapa orang kalau masalah pemanasan global sudah terjadi. Data iklim memang sangat sulit untuk divisualisasikan, dan untuk banyka orang, data berupa tabel tidak cukup meyakinkan untuk mengkomunikasikan masalah tersebut. Salah satu solusinya adalah dengan menggunakan Google Earth untuk menampilkan data dengan cara yang mudah dimengerti. The National Snow and Ice Data Center (NSIDC) telah menciptakan file Google Earth berupa serentetan animasi yang mewakilkan lumernya es di Antartika pada musim panas. Diperbaharui harian, fitur ini memungkinkan anda melihat perubahan konsentrasi es dan laut dalam periode tertentu. Coba saja anda bandingkan data tahun ini dengan data mulai dari tahun 1979 yang lalu, maka anda akan melihat adanya perubahan.

Kota Anda dalam Bentuk 3 Dimensi


Dari pada membuat foto, film, atau hal lainnya tentang bagian dari planet ini, beberapa orang lebih memilih menghabiskan waktu untuk membuat model 3D dari semua bangunan nyata yang ada di dunia ini untuk menambahkan fitur Google Earth. Google mendukung pemerintah lokal dan universitas-universitas untuk menghasilkan model 3D dari kota dan kampus. Bagi yang tidak memiliki sumber daya cukup, Google menyediakan software SketchUp, yang sangat mudah digunakan bagi siapapun yang ingin menciptakan model 3D dari rumah, sekolah, kantor, gubuk, bahkan rumah pohon. Google Earth 3D Warehouse akan menampilkan model-model yang telah dibuat, dan model buatan anda mungkin bisa dipilih untuk menjadi bagian dari 3D warehouse milik Google Earth.

Saksikan Langsung Orbit Satelit-Satelit


Kadang-kadang kita suka memikirkan tentang ribuan satelit yang terbang di atas kepala kita, mentransmisikan sinyal komunikasi, televisi, bahkan mengintip segala kegiatan kita sehari-hari. Database openAPRS menelurusi lokasi terbaru dari ratusan satelit melalui Google Earth, sambil mengelompokkan mereka ke dalam kategori seperti: radio amatir, posisi global, cuaca, bahkan satelit militer.

Ok, demikianlah fitur-fitur Google Earth ini. Ternyata tidak ada yang terlalu jauh untuk kita capai dengan Google Earth. Semoga fitur-fitur ini bisa membuat dunia menjadi lebih baik.(PCWorld)

Load Balancing Dual DSL Speedy di Satu Router

Banyak pertanyaan dari teman-teman, terutama para operator warnet, admin jaringan sekolah/kampus dan korporasi tentang load balancing dua atau lebih koneksi internet. Cara praktikal sebenarnya banyak dijumpai jika kita cari di internet, namun banyak yang merasa kesulitan pada saat diintegrasikan. Penyebab utamanya adalah karena kurang mengerti konsep jaringan, baik di layer 2 atau di layer 3 protokol TCP/IP. Dan umumnya dual koneksi, atau multihome lebih banyak diimplementasikan dalam protokol BGP. Protokol routing kelas ISP ke atas, bukan protokol yang dioprek-oprek di warnet atau jaringan kecil.

Berikut beberapa konsep dasar yang sering memusingkan:

1. Unicast
Protokol dalam trafik internet yang terbanyak adalah TCP, sebuah komunikasi antar host di internet (praktiknya adalah client-server, misal browser anda adalah client maka google adalah server). Trafik ini bersifat dua arah, client melakukan inisiasi koneksi dan server akan membalas inisiasi koneksi tersebut, dan terjadilah TCP session (SYN dan ACK).

2. Destination-address
Dalam jaringan IP kita mengenal router, sebuah persimpangan antara network address dengan network address yang lainnya. Makin menjauh dari pengguna persimpangan itu sangat banyak, router-lah yang mengatur semua trafik tersebut. Jika dianalogikan dengan persimpangan di jalan, maka rambu penunjuk jalan adalah routing table. Penunjuk jalan atau routing table mengabaikan “anda datang dari mana”, cukup dengan “anda mau ke mana” dan anda akan diarahkan ke jalan tepat. Karena konsep inilah saat kita memasang table routing cukup dengan dua parameter, yaitu network address dan gateway saja.

3. Source-address
Source-address adalah alamat IP kita saat melakukan koneksi, saat paket menuju ke internet paket akan melewati router-router ISP, upstream provider, backbone internet dst hingga sampai ke tujuan (SYN). Selanjutnya server akan membalas koneksi (ACK) sebaliknya hingga kembali ke komputer kita. Saat server membalas koneksi namun ada gangguan saat menuju network kita (atau ISPnya) maka komputer kita sama sekali tidak akan mendeteksi adanya koneksi. Seolah-olah putus total, walaupun kemungkinan besar putusnya koneksi hanya satu arah.

4. Default gateway
Saat sebuah router mempunyai beberapa interface (seperti persimpangan, ada simpang tiga, simpang empat dan simpang lima) maka tabel routing otomatis akan bertambah, namun default router atau default gateway hanya bisa satu. Fungsinya adalah mengarahkan paket ke network address yang tidak ada dalam tabel routing (network address 0.0.0.0/0).

5. Dua koneksi
Permasalahan umumnya muncul di sini, saat sebuah router mempunyai dua koneksi ke internet (sama atau berbeda ISP-nya). Default gateway di router tetap hanya bisa satu, ditambah pun yang bekerja tetap hanya satu. Jadi misal router NAT anda terhubung ke ISP A melalui interface A dan gateway A dan ke ISP B melalui interface B dan gateway B, dan default gateway ke ISP A, maka trafik downlink hanya akan datang dari ISP A saja. Begitu juga sebaliknya jika dipasang default gateway ke ISP B.

Bagaimana menyelesaikan permasalahan tersebut?
Konsep utamanya adalah source-address routing. Source-address routing ibaratnya anda dicegat di persimpangan oleh polisi dan polisi menanyakan “anda dari mana?” dan anda akan ditunjukkan ke jalur yang tepat.

Pada router NAT (atau router pada umumnya), source-address secara default tidak dibaca, tidak dipertimbangkan. Jadi pada kasus di atas karena default gateway ke ISP A maka NAT akan meneruskan paket sebagai paket yang pergi dari IP address interface A (yang otomatis akan mendapat downlink dari ISP A ke interface A dan diteruskan ke jaringan dalam).

Dalam jaringan yang lebih besar (bukan NAT), source-address yang melewati network lain disebut sebagai transit (di-handle dengan protokol BGP oleh ISP). Contoh praktis misalnya anda membeli bandwidth yang turun dari satelit melalui DVB, namun koneksi uplink menggunakan jalur terestrial (dial-up, leased-line atau fixed-wireless). Dalam kasus ini paket inisiasi koneksi harus menjadi source-address network downlink DVB, agar bandwidth downlink dari internet mengarah DVB receiver, bukan ke jalur terestrial.

Di lingkungan Linux, pengaturan source-address bisa dilakukan oleh iproute2. Iproute2 akan bekerja sebelum diteruskan ke table routing. Misal kita mengatur dua segmen LAN internal agar satu segmen menjadi source-address A dan satu segmen lainnya menjadi source-address B, agar kedua koneksi ke ISP terutilisasi bersamaan.

Penerapan utilisasi dua koneksi tersebut bisa mengambil tiga konsep, yaitu round-robin, loadbalance atau failover.

6. Round-robin
Misalkan anda mempunyai tiga koneksi internet di satu router NAT, koneksi pertama di sebut Batman, koneksi kedua disebut Baskin dan koneksi ketiga disebut Williams, maka konsep round-robin adalah sang Robin akan selalu berpindah-pindah secara berurutan mengambil source-address (bukan random). Misal ada satu TCP session dari komputer di jaringan internal, maka koneksi TCP tersebut tetap di source-address pertama hingga sesi TCP selesai (menjadi Batman & Robin). Saat TCP session Batman & Robin tersebut belum selesai, ada ada request koneksi baru dari jaringan, maka sang Robin akan mengambil source-address koneksi berikutnya, menjadi Baskin & Robin. Dan seterusnya sang Robin akan me-round-round setiap koneksi tanpa memperhatikan penuh atau tidaknya salah satu koneksi.

Pasti anda sedang pusing membaca kalimat di atas, atau sedang tertawa terbahak-bahak.

7. Loadbalance
Konsep loadbalance mirip dengan konsep round-robin di atas, hanya saja sang Robin dipaksa melihat utilisasi ketiga koneksi tersebut di atas. Misalkan koneksi Batman & Robin serta Baskin & Robin sudah penuh, maka koneksi yang dipilih yang lebih kosong, dan koneksi yang diambil menjadi Robin Williams. Request koneksi berikutnya kembali sang Robin harus melihat dulu utilisasi koneksi yang ada, apakah ia harus menjadi Batman & Robin, Baskin & Robin atau Robin Williams, agar semua utilisasi koneksi seimbang, balance.

8. Failover
Konsep fail-over bisa disebut sebagai backup otomatis. Misalkan kapasitas link terbesar adalah link Batman, dan link Baskin lebih kecil. Kedua koneksi tersebut terpasang online, namun koneksi tetap di satu link Batman & Robin, sehingga pada saat link Batman jatuh koneksi akan berpindah otomatis ke link Baskin, menjadi Baskin & Robin hingga link Batman up kembali.

*makan es krim Haagendaz dulu*

Tools NAT yang mempunyai ketiga fitur di atas adalah Packet Firewall (PF) di lingkungan BSD, disebut dengan nat pool. Saya belum menemukan implementasi yang bagus (dan cukup mudah) di Linux dengan iproute2.

*Uraian panjang di atas hanyalah kata sambutan sodara-sodara…*

Berikut contoh implementasi load balance dua koneksi sesuai judul di atas. Dijalankan di mesin OpenBSD sebagai NAT router dengan dua koneksi DSL Telkom, interface ethernet sk0 dan sk1.

1. Aktifkan forwarding di /etc/sysctl.conf

net.inet.ip.forwarding=1

2. Pastikan konfigurasi interface dan default routing kosong, hanya filename saja

# /etc/hosts.sk0
# /etc/hosts.sk1
# /etc/hostname.sk0
# /etc/hostname.sk1
# /etc/mygate

Script koneksi DSL Speedy, pppoe0 untuk koneksi pertama dan pppoe1 untuk koneksi kedua. Sesuaikan interface, username dan passwordnya. Jangan lupa, gunakan indent tab.

# /etc/ppp/ppp.conf
default:
set log Phase Chat LCP IPCP CCP tun command
set redial 15 0
set reconnect 15 10000
pppoe0:
set device "!/usr/sbin/pppoe -i sk0"
disable acfcomp protocomp
deny acfcomp
set mtu max 1492
set mru max 1492
set crtscts off
set speed sync
enable lqr
set lqrperiod 5
set cd 5
set dial
set login
set timeout 0
set authname blahblahblah@telkom.net
set authkey asaljangandejek
add! default HISADDR
enable dns
enable mssfixup
pppoe1:
set device "!/usr/sbin/pppoe -i sk1"
disable acfcomp protocomp
deny acfcomp
set mtu max 1492
set mru max 1492
set crtscts off
set speed sync
enable lqr
set lqrperiod 5
set cd 5
set dial
set login
set timeout 0
set authname blahblahblah2@telkom.net
set authkey vikingboneksamasaja
add! default HISADDR
enable dns
enable mssfixup

3. Aktifkan interface sk0 dan sk1

# ifconfig sk0 up
# ifconfig sk1 up

4. Jalankan PPPoE, Point to Point Protocol over Ethernet.

# ppp -ddial pppoe0
# ppp -ddial pppoe1

5. Jika koneksi Speedy berhasil, IP address dari Speedy akan di-binding di interface tunneling tun0 dan tun1

# ifconfig
tun0: flags=8051 mtu 1492
groups: tun egress
inet 125.xxx.xxx.113 --> 125.163.72.1 netmask 0xffffffff
tun1: flags=8051 mtu 1492
groups: tun
inet 125.xxx.xxx.114 --> 125.163.72.1 netmask 0xffffffff

6. Dan default gateway akan aktif

# netstat -nr |more
Routing tables
Internet:
Destination Gateway Flags Refs Use Mtu Interface
default 125.163.72.1 UGS 7 17529 - tun0

7. Serta konfigurasi resolver DNS pun akan terisi

# cat /etc/resolv.conf
lookup file bind
nameserver 202.134.2.5
nameserver 203.130.196.5

8. Aktifkan Packet Firewall pf

# /etc/rc.conf
pf=”YES”

9. Script Packet Firewall NAT dan balancing dengan round-robin (ganti round-robin dengan loadbalance jika lebih sesuai dengan kebutuhan anda). Baris yang di-indent masih termasuk baris di atasnya. Entah kenapa tag (pre) malah menghilangkan karakter backslash (\).

# /etc/pf.conf
lan_net = "10.0.0.0/8"
int_if = "vr0"
ext_if1 = "tun0"
ext_if2 = "tun1"
ext_gw1 = "125.163.72.1"
ext_gw2 = "125.163.72.1"
# scrub all
scrub in all
# nat outgoing connections on each internet interface
nat on $ext_if1 from $lan_net to any -> ($ext_if1)
nat on $ext_if2 from $lan_net to any -> ($ext_if2)
# pass all outgoing packets on internal interface
pass out on $int_if from any to $lan_net
# pass in quick any packets destined for the gateway itself
pass in quick on $int_if from $lan_net to $int_if
# load balance outgoing tcp traffic from internal network.
pass in on $int_if route-to \
{ ($ext_if1 $ext_gw1), ($ext_if2 $ext_gw2) } round-robin \
proto tcp from $lan_net to any flags S/SA modulate state
# load balance outgoing udp and icmp traffic from internal network
pass in on $int_if route-to \
{ ($ext_if1 $ext_gw1), ($ext_if2 $ext_gw2) } round-robin \
proto { udp, icmp } from $lan_net to any keep state
# general "pass out" rules for external interfaces
pass out on $ext_if1 proto tcp from any to any flags S/SA modulate state
pass out on $ext_if1 proto { udp, icmp } from any to any keep state
pass out on $ext_if2 proto tcp from any to any flags S/SA modulate state
pass out on $ext_if2 proto { udp, icmp } from any to any keep state

10. Aktifkan script yang diperlukan di /etc/rc.local agar setiap reboot langsung bekerja.

ifconfig sk0 up
ifconfig sk1 up
# aktifkan speedy
ppp -ddial pppoe0
ppp -ddial pppoe1

PF akan langsung bekerja membaca /etc/pf.conf.
Jika harus me-restart koneksi DSL Speedy, pastikan pppoe dimatikan dulu

# pkill ppp

Jika tidak, maka ppp akan membuat tunneling baru menjadi tun2, tun3 dan seterusnya.

11. Untuk memantau fungsi nat pool round-robin di atas bekerja atau tidak, bisa menggunakan tools pftop yang bisa diambil di http://www.eee.metu.edu.tr/~canacar/pftop/

Jika anda mengoptimasikan koneksi jaringan juga dengan menggunakan proxy, misalnya Squid, maka proxy Squid jangan dipasang juga di mesin router NAT tersebut, sebab saat Squid mengakses halaman web ke internet; oleh PF dianggap bukan sebagai koneksi NAT, jadi tidak akan di-balance, dan akan stay mengambil interface utama dan default gateway pertama. Simpanlah mesin proxy/squid di belakang router NAT, agar koneksi proxy ke internet menjadi trafik NAT yang akan di-balance oleh script PF di atas.


Thanks to Starchie dan Hengky atas tutorial basic PF di OpenBSD.